Be more independent and more aware of your instrument
In order to work properly, your instrument requires constant care. Without this care, no violin maker, not even Stradivari, has the ability to maintain it at its optimum level.
Improve your ease of playing
To play properly, of course, you have to be able to tune your instrument. When you consider it from a mechanical point of view, you can see that it consists of a system for tightening the cords – the pegs and the fine tuners – and a system for guiding the strings – the nut and the bridge.
Three simple little things you can do
Grease the pegs, lubricate the notches where the strings cross the nut and the bridge, and regularly check the angle of the bridge (and adjust it, if necessary).
These three simple little actions will ensure a longer life for both the strings and the bridge. If you take care of it, a well-designed bridge can easily last ten years!
1. Greasing the pegs
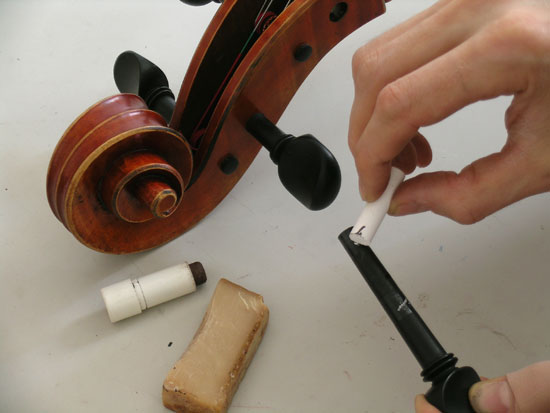 To grease the pegs, you take them out one by one and coat the part that is in contact with the pegbox, using a semi-lubricating paste* or dry soap and, if they slip too easily, a little chalk (very little, as it is abrasive and could, in the long term, jeopardise the proper working of the pegs). Before putting a string back on, turn each peg at least 20 times in each direction, in order to distribute the paste evenly.
To ensure that your instrument’s pegs work properly, you must use them regularly. If the tailpiece of your instrument is fitted with fine tuners, don’t wait until they’re won’t turn any further before using the pegs for tuning!
Major variations in the humidity of the air can lead to the pegs and the pegbox swelling or shrinking, causing the pegs to get stuck or to become loose. As the pegs are conical, you should push them in a little more when it is dry and pull them out when it is more humid; otherwise, there is a risk that they will get stuck and that the holes will become oval.
*Available in music shops or from your violin maker.
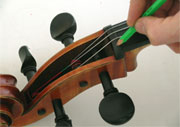
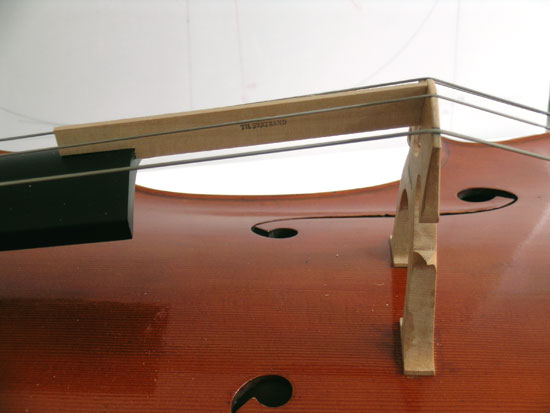
2. Lubricating the string notches
The string notches on the nut and on the bridge should be lubricated using very soft pencil graphite (6B).
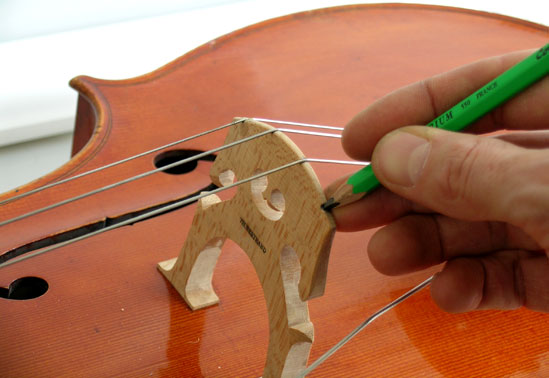
When the notches are well lubricated, it is easy to straighten up the bridge with the strings fully tightened. If you cannot do so, this may be because the notches are too narrow or too deep: the strings should not go deeper than a third to a half of the diameter of the string.
On the bridge the notch for the first string is fitted with a piece of parchment: without this, the string would soon cut into the bridge. It is recommended that you should also fit one if you are playing a violin A string made of steel. If you change the diameter of the strings, it may be necessary to ask your violin maker to alter the notches.
3. Adjusting the bridge
The side of the bridge facing the tailpiece should be at right angles to the plane of the ribs.
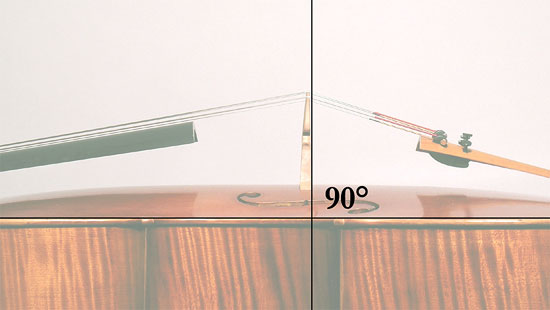
If it is not, the pressure of the strings will not be correctly applied to the bridge.
The instrument’s response will be affected by this and eventually the bridge will warp in a way that is irreversible – and may even break. It is well to remember that a violin bridge weighs less than 2 grams and is subjected to a pressure of about 5 kilos!
To straighten it up, hold the instrument between your knees and take the bridge between the fingers of both hands, with the thumbs on one side and the fingers on the other, then ease it into the correct position. This operation should be carried out with the strings fully tightened; otherwise, the bridge will more than likely tip forward again towards the fingerboard.
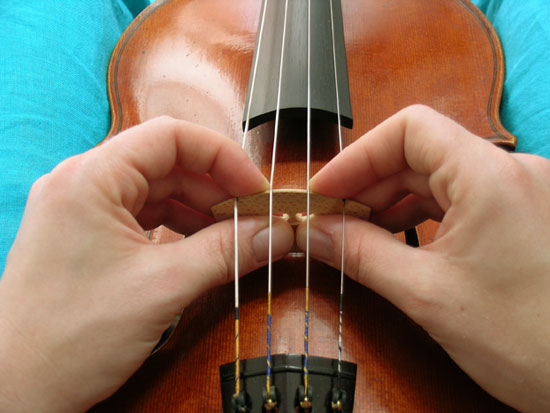
It is not always easy to see whether the position is correct; you could ask your violin maker to make you a wooden gauge that will fit exactly between the top of the bridge and the end of the fingerboard.
The angle of the bridge should be checked at least once a week – and more frequently when you have recently replaced the strings. With a little practice, checking and adjusting your bridge will come naturally, like tuning your instrument or rosining your bow.
Cleaning your instrument
For the musician, cleaning the instrument involves a number of simple everyday actions, intended to restrict deposits of rosin, the accumulation of dust, etc.
The fingerboard and the strings
The fingerboard and the strings (except for gut strings) should be cleaned with a piece of cloth or a paper handkerchief moistened with alcohol. Protect the varnish: in no circumstances must the alcohol be allowed to run onto it!
Some precautions you should take
Do not leave a cloth moistened with alcohol on a surface where you might put your instrument down. Close the bottle of alcohol immediately, once you have moistened the cloth: if it were to spill on your instrument, the results would be catastrophic! Never carry a bottle of alcohol in your case; even when properly closed, it could leak, especially in the course of a plane journey (because of the changes of pressure).
The varnish
Every time you stop playing you should wipe your violin with a soft (or microfibre) cloth, especially the top plate and the bow stick, in order to remove deposits of rosin and any droplets of perspiration. In this way, you can very effectively limit the accumulation of rosin, to which dust and other dirt would inevitably stick.
Certain commercial products should be avoided, as some of their constituents are more likely to make the varnish sticky than to clean it. The varnish is made shiny, but it becomes sticky and will get even dirtier.
It is better to have the instrument cleaned by a violin maker, for example, during the annual check-up. The violin maker will choose the most suitable products and methods; he or she will in some cases use solvent like alcohol, which could have catastrophic results in inexperienced hands.